0、docker-compose,需要先安装这个东西
https://docs.docker.com/get-started/get-docker/
1、创建nextcloud目录
mkdir -p nextcloud/{mysql_data,app_data,document_data,document_log} && touch nextcloud/nginx.conf
2、nginx配置
cd nextcloud
vim nginx.conf
user  www-data;
worker_processes  1;

error_log  /var/log/nginx/error.log warn;
pid        /var/run/nginx.pid;

events {
    worker_connections  1024;
}

http {

    upstream backend {
      server app-server:9000;
    }


    include       /etc/nginx/mime.types;
    default_type  application/octet-stream;

    log_format  main  '$remote_addr - $remote_user [$time_local] "$request" '
                      '$status $body_bytes_sent "$http_referer" '
                      '"$http_user_agent" "$http_x_forwarded_for"';

    access_log  /var/log/nginx/access.log  main;

    sendfile        on;
    #tcp_nopush     on;

    keepalive_timeout  65;

    map $http_host $this_host {
        "" $host;
        default $http_host;
    }

    map $http_x_forwarded_proto $the_scheme {
        default $http_x_forwarded_proto;
        "" $scheme;
    }

    map $http_x_forwarded_host $the_host {
       default $http_x_forwarded_host;
       "" $this_host;
    }

    server {
       listen 80;

        # Add headers to serve security related headers
        add_header Strict-Transport-Security "max-age=15768000; includeSubDomains; preload;";
        add_header X-Content-Type-Options nosniff;
        add_header X-XSS-Protection "1; mode=block";
        add_header X-Robots-Tag none;
        add_header X-Download-Options noopen;
        add_header X-Permitted-Cross-Domain-Policies none;

        root /var/www/html;
        client_max_body_size 10G; # 0=unlimited - set max upload size
        fastcgi_buffers 64 4K;

        gzip off;

        index index.php;
        error_page 403 /core/templates/403.php;
        error_page 404 /core/templates/404.php;

        rewrite ^/.well-known/carddav /remote.php/dav/ permanent;
        rewrite ^/.well-known/caldav /remote.php/dav/ permanent;

        location = /robots.txt {
            allow all;
            log_not_found off;
            access_log off;
        }

        location ~ ^/(build|tests|config|lib|3rdparty|templates|data)/ {
            deny all;
        }

        location ~ ^/(?:\.|autotest|occ|issue|indie|db_|console) {
            deny all;
        }

        location / {
            rewrite ^/remote/(.*) /remote.php last;
            rewrite ^(/core/doc/[^\/]+/)$ $1/index.html;
            try_files $uri $uri/ =404;
        }

    location ~* ^/ds-vpath/ {
        rewrite /ds-vpath/(.*) /$1  break;
                proxy_pass http://onlyoffice-document-server;
                proxy_redirect     off;

                client_max_body_size 100m;

                proxy_http_version 1.1;
                proxy_set_header Upgrade $http_upgrade;
                proxy_set_header Connection "upgrade";

                proxy_set_header Host $http_host;
                proxy_set_header X-Real-IP $remote_addr;
                proxy_set_header X-Forwarded-For $proxy_add_x_forwarded_for;
                proxy_set_header X-Forwarded-Host $the_host/ds-vpath;
                proxy_set_header X-Forwarded-Proto $the_scheme;
        }

        location ~ \.php(?:$|/) {
            fastcgi_split_path_info ^(.+\.php)(/.+)$;
            include fastcgi_params;
            fastcgi_param SCRIPT_FILENAME $document_root$fastcgi_script_name;
            fastcgi_param PATH_INFO $fastcgi_path_info;
            fastcgi_param HTTPS off;
            fastcgi_param modHeadersAvailable true; #Avoid sending the security headers twice
            fastcgi_pass backend;
            fastcgi_intercept_errors on;
        }

        # Adding the cache control header for js and css files
        # Make sure it is BELOW the location ~ \.php(?:$|/) { block
        location ~* \.(?:css|js)$ {
            add_header Cache-Control "public, max-age=7200";
            # Add headers to serve security related headers
            add_header Strict-Transport-Security "max-age=15768000; includeSubDomains; preload;";
            add_header X-Content-Type-Options nosniff;
            add_header X-Frame-Options "SAMEORIGIN";
            add_header X-XSS-Protection "1; mode=block";
            add_header X-Robots-Tag none;
            add_header X-Download-Options noopen;
            add_header X-Permitted-Cross-Domain-Policies none;
            # Optional: Don't log access to assets
            access_log off;
        }

        # Optional: Don't log access to other assets
        location ~* \.(?:jpg|jpeg|gif|bmp|ico|png|swf)$ {
            access_log off;
        }

    }
}
3、创建 docker-compose.yml
vim docker-compose.yml
version: '3'
services:
  app:
    container_name: app-server
    image: nextcloud:fpm
    stdin_open: true
    tty: true
    restart: always
    expose:
      - '80'
      - '9000'
    networks:
      - onlyoffice
    volumes:
      - ./app_data:/var/www/html
  onlyoffice-document-server:
    container_name: onlyoffice-document-server
    image: onlyoffice/documentserver:latest
    stdin_open: true
    tty: true
    restart: always
    networks:
      - onlyoffice
    expose:
      - '80'
      - '443'
    volumes:
      - ./document_data:/var/www/onlyoffice/Data
      - ./document_log:/var/log/onlyoffice
    ports:
      - 2280:80     #onlyoffice的端口:左侧的端口可以自定义
      - 4423:443
    environment:
      - JWT_ENABLED=true          #打开秘钥认证
      - JWT_SECRET=root123456     #onlyoffice的秘钥
  nginx:
    container_name: nginx-server
    image: nginx
    stdin_open: true
    tty: true
    restart: always
    ports:
      - 2380:80          #nextcloud的端口 左侧的端口可以自定义
      - 4433:443
    networks:
      - onlyoffice
    volumes:
      - ./nginx.conf:/etc/nginx/nginx.conf
      - ./app_data:/var/www/html
  db:
    container_name: mariadb
    image: mariadb
    restart: always
    volumes:
      - ./mysql_data:/var/lib/mysql
    environment:
      - MYSQL_ROOT_PASSWORD=Mysql123    #数据库root密码
      - MYSQL_PASSWORD=Msql123          #数据库密码
      - MYSQL_DATABASE=nextcloud         #数据库名称
      - MYSQL_USER=nextcloud             #数据库用户
    networks:
      - onlyoffice
networks:
  onlyoffice:
    driver: 'bridge'
4、创建运行容器
docker compose up -d #运行容器
docker compose ps #查看是否开启成功
正常启动如下所示
docker-compose ps
WARN[0000] /root/nextcloud/docker-compose.yml: the attribute version is obsolete, it will be ignored, please remove it to avoid potential confusion
NAME IMAGE COMMAND SERVICE CREATED STATUS PORTS
app-server nextcloud:fpm "/entrypoint.sh php-…" app 2 hours ago Up 2 hours 80/tcp, 9000/tcp
mariadb mariadb "docker-entrypoint.s…" db 2 hours ago Up 2 hours 3306/tcp
nginx-server nginx "/docker-entrypoint.…" nginx 2 hours ago Up 18 seconds 0.0.0.0:2380->80/tcp, [::]:2380->80/tcp, 0.0.0.0:4433->443/tcp, [::]:4433->443/tcp
onlyoffice-document-server onlyoffice/documentserver:latest "/app/ds/run-documen…" onlyoffice-document-server 2 hours ago Up 2 hours 0.0.0.0:2280->80/tcp, [::]:2280->80/tcp, 0.0.0.0:4423->443/tcp, [::]:4423->443/tcp
5、打开程序进行配置
5.1、配置onlyoffice
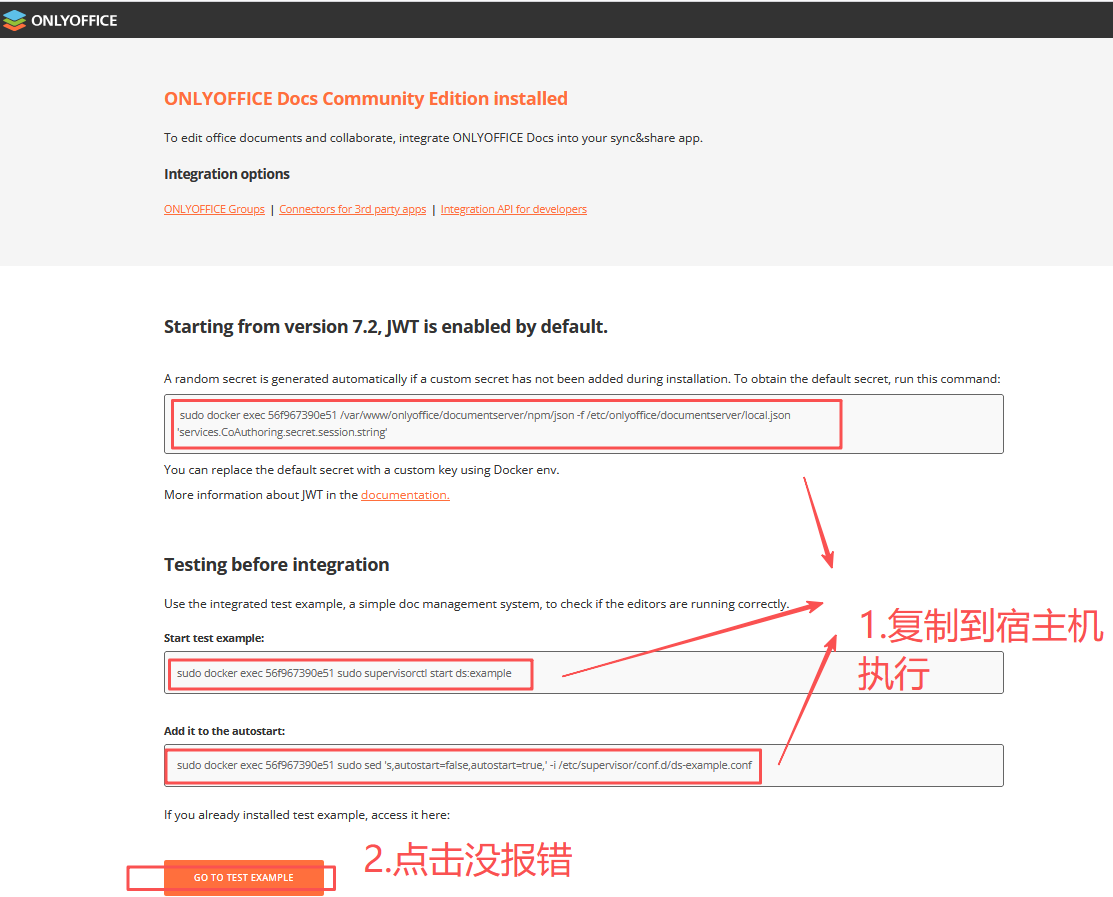
http://ip:2280 #打开自己服务器的端口加ip进入web页面
5.2、配置nextcloud
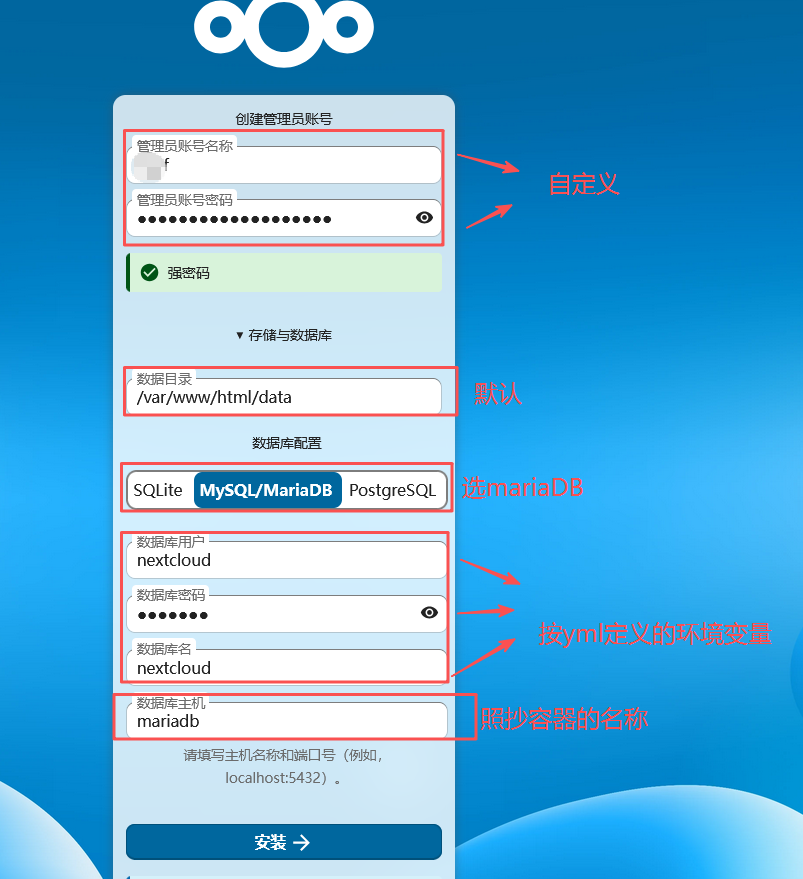
http://ip:2380 #打开自己服务器的端口加ip进入web页面,配置信息都在docker-compose.yml中,点击安装等待几分钟;
6、nextcloud与onlyoffice连接配置
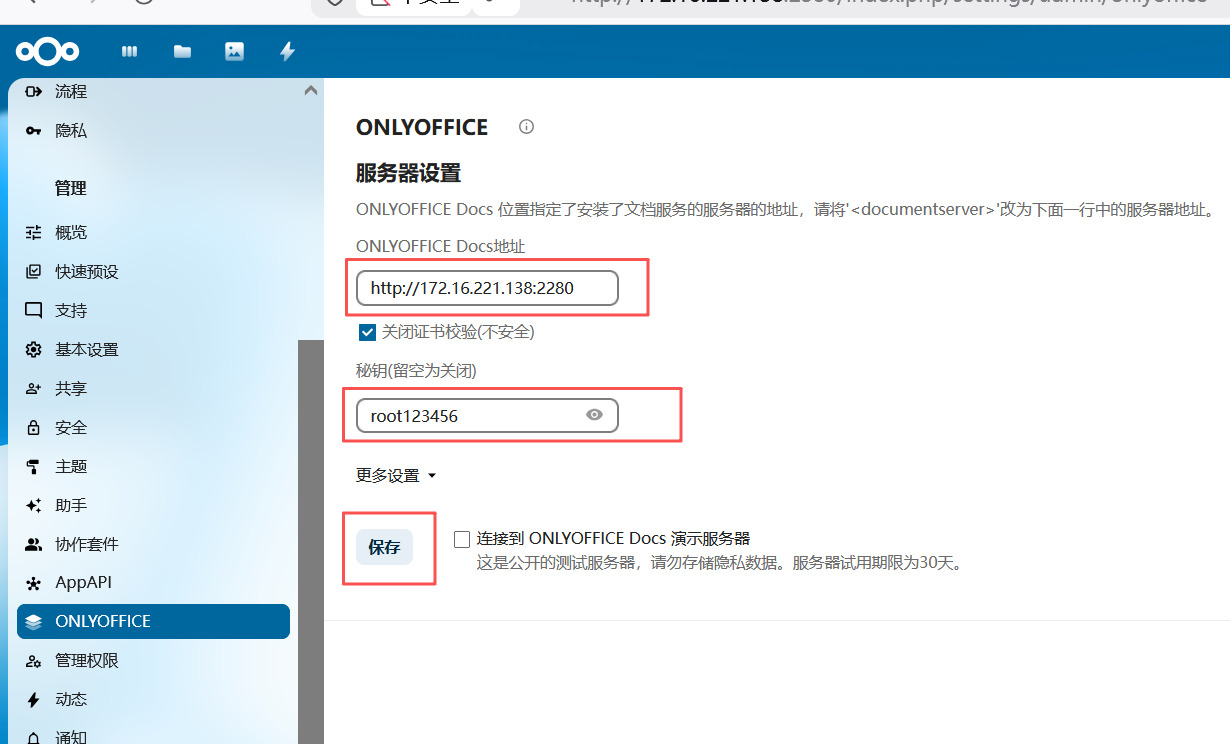
打开设置+应用-选择file-找到onlyoffice下载并启用
然后选择管理应用-ONLYOFFICE -填写ONLYOFFICE Docs地址:"http://ip:2280", 密钥:“docker-compose.yml中” , 保存
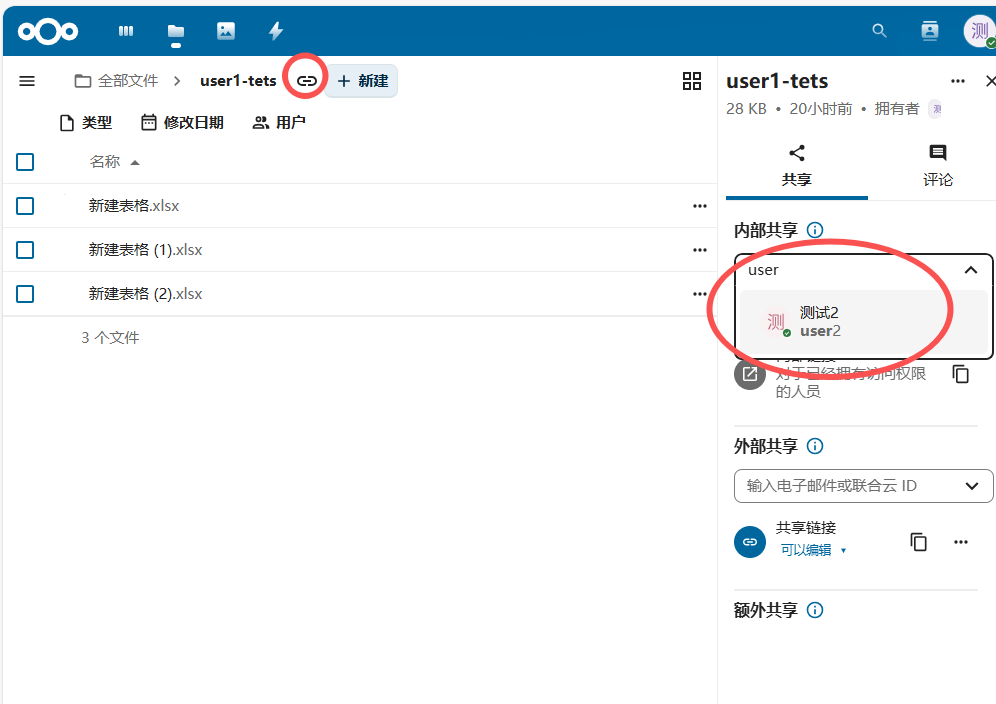
7、文件夹共享设置


评论 (0)